
OpenCV
Python Code Snippets
Summary
In questo post, che aggiornerò con il tempo, riporterò snippets di codice con le funzioni più utili di OpenCV Python. Poiché, non utilizzando per certi periodi alcune di queste funzioni la mia memoria decide di formattare tutto, ho deciso di mantenere traccia di questi importanti strumenti in questa pagina. Per chi non lo sapesse, OpenCV è una formidabile e potente libreria di computer vision scritta in C++ che dal 2015 supporta Python 3+! Se non si vuole installare la versione completa, le funzioni base sono raccolte nel pacchetto “opencv-python” che può essere comodamente installato attraverso “pip”.
Basic Operations with Images
Loading, Displaying and Saving
import cv2

# import an image from disk
img = cv2.imread("path/of/image.png")

# show an image
cv2.imshow("Name of the Window", img)
# pause until a key is pressed
cv2.waitKey(0)

# save an image
cv2.imwrite("new/path/image.png", img)
La funzione “waitKey()” serve a sospendere l’esecuzione del codice. La variabile che passiamo indica il tempo di attesa; se zero il programma attenderà un segnale per un tempo infinito.
> Manipulate Pixels
# get (0,0) pixel value and assign to a tupple
(b, g, r) = img[0, 0]

# assign at (0,0) a new value
img[0, 0] = (0, 0, 255)

# crop a portion of an image
crop = img[0:100, 0:100]

# assign a new value to an entire portion
img[0:100, 0:100] = (0, 255, 0)
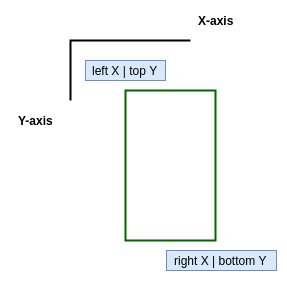
Un immagine è un numpy array con una “shape”, (altezza, larghezza, profondità), dove profondità, per un immagine a colori, è sempre tre. Quindi può essere facilmente manipolata come una matrice tridimensionale. È da tenere bene a mente che OpenCV per motivi storici ordina i canali come B G R e NON R G B. Inoltre, quando usiamo le funzioni di OpenCV il sistema di riferimento segue quello classico delle immagini (larghezza, altezza) e quindi ha gli assi invertiti.
> Drawing Geometric Shapes
# create a black canvas where to draw
blue_color = (255, 0, 0)
canvas = np.zeros((300, 300, 3), dtype = "uint8")

# ----LINE
# attributes: where_to_draw, starting_point, end_point, color, thickness
cv2.line(canvas, (250, 0), (0, 250), blue_color, 2)

# ----RECTANGLE
# attributes: where_to_draw, starting_point, end_point, color, thickness (if -1 full)
cv2.rectangle(canvas, (200, 0), (300, 300), blue_color, -1)

# ----CIRCLE
# attributes: where_to_draw, center (x,y), radius, color, thickness (if -1 full)
cv2.circle(canvas, (200,200), 10, blue_color, 3)

# ----POLYGON
# create an array (int32) with vertices and reshape (rows, 1, 2)
pts = np.array([[10,5],[20,30],[70,20],[50,10]], np.int32)
pts = pts.reshape((-1,1,2))
# attributes: where_to_draw, points, close_or_not, color
cv2.polylines(canvas, [pts], True, blue_color)

# ----TEXT
# attributes: where_to_draw, what_to_write, starting_point (x,y), font, font_scale, color, thickness, line_type
font = cv2.FONT_HERSHEY_SIMPLEX
cv2.putText(canvas, 'OpenCV', (100, 100), font, 4, blue_color, 2, cv2.LINE_AA)
Tutte le coordinate seguono il sistema di riferimento di OpenCV.